I. Introduction
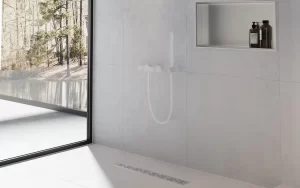
The modern bathroom is quickly adopting linear shower drains with their simple yet effective functionality and sleek design. They are minimalist in look and improve the drainage efficiency of the pool. If you’re working on a renovation or new bathroom project, knowing how to install a linear shower drain correctly is important. The instructions within this guide provide clear, step by step installation steps for various scenarios along with some tips and considerations specific to your bathroom.
II. Understanding Linear Shower Drains
1. What is a Linear Shower Drain?
A Linear Shower Drain is just that, a shower pan with an elongated drain configuration allowing water to flow curbside or off the shower pan.
It’s a unique, long and narrow drain that collects water on a wider surface than the standard point drain. While its water goes to a single elongated opening instead of a central collection point.
2. Benefits of Linear Shower Drains
- Improved Aesthetics: This gives the bathroom a clean, modern look that can match the bathroom design.
- Efficient Drainage: Reducing the risk of pooling, are suitable for highflow water systems.
- Versatility: It can be installed in all floor types like in concrete, ceramic tiles or wood subfloor.
- Accessibility: Great for curbless showers and wider accessibility of people with limited mobility.
III. Key Installation Scenarios
1. Curbless Shower
(1)Advantages of Installing a Linear Drain in a Curbless Shower
Barrier free and improving accessibility, curbless showers are the best option. Linear drains can direct water flow more efficiently so it doesn’t flow out onto the rest of the bathroom floor.
(2)Step-by-step Installation Guide:
- Mark the Drain Location: Find where the best placement is, usually one edge of the shower.
- Prepare the Shower Floor: Ensure that water works properly and you get a slope of 1.5% – 2% towards drain.
- Install Waterproofing: Seal the floor with waterproof membrane, and the walls as well.
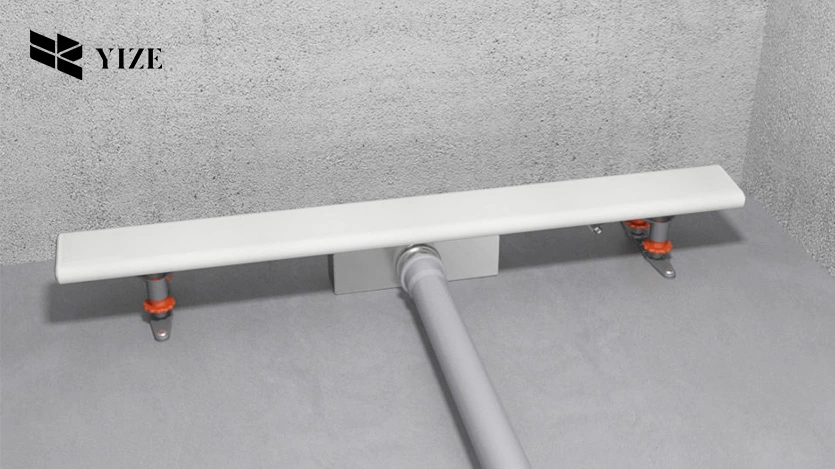
- Fit the Drain: Attach the drain base with screws and it should be connected with the plumbing system.
- Test for Leaks: Before tiling, run water through the drain to make sure there are no leaks.
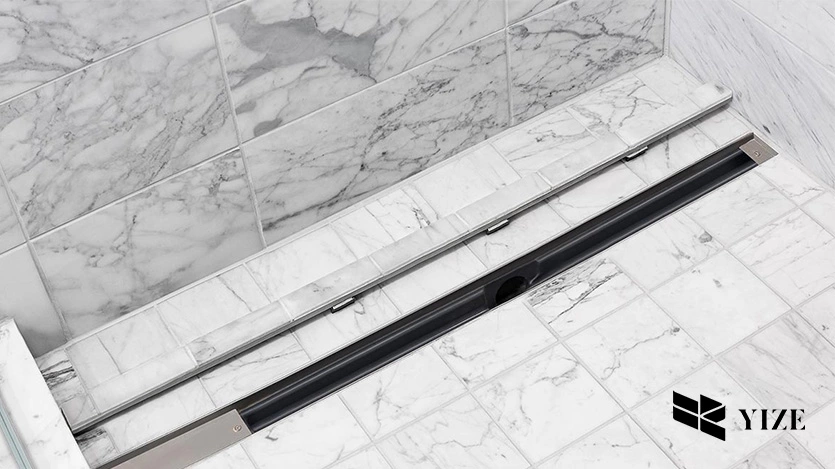
- Finish with Tiling: Carefully lay tiles on top aligned with the drain for a good finished look.
(3)Tools and Materials Needed:
- Leveling tools
- Waterproof membrane
- Screws and adhesive
- Drain base and cover
(4)Common Challenges and Solutions:
- Waterproofing Issues: Avoid leaks by using high quality membranes.
- Incorrect Slope: Measure again to prevent water stagnation.
2. Concrete
Installing a linear drain into a concrete floor can be complex.
Modifying concrete floors is labor intensive so they require careful planning. The right measurements and pre installation check is essential.
(1)Steps:
- Cut the Concrete: Make a ditch in which drain and pipe are installed.
- Install Plumbing: Connect the drain to plumbing system in place.
- Apply a Mortar Bed: Mortar layer pour, i.e., cause the floor to slope toward the drain.
- Install the Drain: Secure into the trench and seal with adhesive.
- Add Waterproofing: Spread liquid or sheet membrane over the concrete.
- Tile the Floor: Place the tiles to lay with the drain cover.
(2)Tools and Materials:
- Concrete saw
- Mortar and trowel
- Plumbing connectors
(3)Tips for Success:
- Check Permits: You need to ensure that you comply with plumbing codes of a locality.
- Double-Check Measurements: Do not cut the incorrect trench size.
3. Ceramic Tile
(1)Benefits and Challenges of Installing Linear Drains with Ceramic Tile
Ceramic tiles are long lasting and beautiful. But, cutting tiles in a way that they will fit around the drain is not very easy.
(2)Procedure:
- Waterproof the Floor: Place another layer of cement treated with water proofing agent before putting the tiles.
- Place the Drain: Lay the drain where you want it to be installed.
- Lay the Tiles: It is best to cut the tiles to fit the drain to make the installation more professional.
- Grout and Seal: To avoid penetration of water into the gaps use water resistant grout for filling the gaps.
(3)Tools and Materials Required:
- Tile cutter
- Waterproof grout
- Adhesive mortar
(4)Tips for Avoiding Cracks:
- Let tiles to settle before applying the grout to avoid movement while applying them.
4. Wooden Subfloor
Such wooden subfloors need to be reinforced to take the weight of the drain and to minimize the effects of water damage.
(1)Guide:
- Reinforce the Subfloor: To make it more stable to carry add more support for weight.
- Install a Waterproof Layer: Make sure to cover the wood with a waterproof material.
- Secure the Drain: Install the drain onto the subfloor by driving screws through the drain’s flange.
- Connect Plumbing: Connect the drain to the water or sewerage system of the house.
- Finish with Flooring: In the last step put a layer of tiles or stone on the subfloor.
(2)Required Tools and Materials:
- Plywood reinforcement
- Waterproofing sheet
(3)Tips for Protection:
- For this reason, it is recommended to use moisture resistant wood in order to increase the durability of the floor.
IV. Best Time to Install a Linear Shower Drain

1. Seasonal Considerations
Conditions of weather may affect installation. For instance, do not place concrete in cold weather to prevent some setting problems.
2. New Construction vs. Renovation Projects
Linear drains are relatively easy to install during construction because there are few factors to consider. In renovations, a lot of problems that may result to structural damage can be easily prevented if only proper planning is done.
V. Why Choose YZDRAIN?
YZDRAIN products present robust and progressive options for linear shower drains. They are recognized for offering durable products made of quality materials and easy-to-use products for both the professional and the do-it-yourself person.
VI. Video Resources
– YouTube video on how to install a linear shower drain
– Links to videos demonstrating the installation process for different scenarios (curbless shower, concrete, ceramic tile, and wooden subfloor)
VII. Conclusion
Line shower drains are a practical and beautiful option for today’s bathroom designs. If properly planned and installed, they offer aesthetic value and can also improve the usage of your area. If you follow these instructions carefully, it is possible to get a professional outcome.
FAQs
1. Can I install a linear shower drain myself, or do I need a professional?
If you have some experience in plumbing and follow the guidelines below, you can easily install your linear shower drain on your own. For such cases, it is advised that one gets a professional to do it for them.
2. How do I ensure my linear shower drain doesn’t leak?
To avoid leakage it is important to ensure that the drain is well sealed and waterproofed around the area. It is always important to carry out a leakage check before having the tiling done.
3. What is the ideal slope for a linear shower drain?
The ideal slope for a linear shower drain is typically ¼ inch per foot (also known as a 2% slope), meaning the shower floor should drop ¼ inch for every foot of distance from the drain towards the opposite wall; this ensures proper water drainage without creating an overly steep incline that could be uncomfortable to stand on.
4.Do you need a flange for a linear shower drain?
Yes, most linear shower drains require a flange to meet waterproofing standards. However, some waterproofing techniques don’t require a flange. You can check your drain’s manufacturer’s guide for more information.Here are some things to consider when choosing a linear shower drain and flange:
Waterproofing:There are two main waterproofing techniques: traditional and modern. Traditional waterproofing uses a clamping flange to connect to the waste line. Modern waterproofing uses a liquid membrane or fabric sheet that bonds to a flanged edge on the linear drain channel.
Compatibility:Some linear shower drains are designed to be compatible with modern tile laying techniques. This can help create a sleek, low-profile shower floor.