
Have you ever experienced taking a shower with drainage slower than a snail? Or worse, one that stinks of something crawling in and never making its way out? If you are in the same boat, it is time to get down to business and install a new shower drain.
It’s much easier than you could think! This guide will discuss everything you need about DIY showerdrain installation from tools and tips to common mistakes. Read on to learn more.
I. Why Consider Installing a Shower Drain Yourself?
You might wonder, “Why not just call a plumber?” Well, here’s the deal:
- Save money: Professional installation can cost a few hundred bucks. Doing it yourself is nearly free!
- Personal satisfaction: There’s nothing like saying, “Yeah, I did that.”
- Custom results: Want a slick linear drain or a stainless steel one with anti-odor features? You’re in control.
II. Tools and Materials You’ll Need
Don’t start without these essentials in your toolbox:
- Measuring tape
- Screwdriver
- Plumber’s putty
- Pipe wrench
- Silicone sealant
- Drain assembly (consider YZDRAIN’s linear or square drain)
- Utility knife
- Level
- Bucket and sponge
III. Choose the Right Drain
Not all shower drains are created equal. Here’s what you should know:
- Linear Drains: Great for modern showers. YZDRAIN’s A-Series drains offer fast water flow (up to 60 L/min!) and a sleek style.
- Square Drains: Easy to install and ideal for most traditional setups.
- Anti-Odor Designs: YZDRAIN offers gravity-type deodorant cores and spring-loaded seals to keep your bathroom fresh.
Pro tip: Look for CE or CUPC-certified products. It ensures safety and performance.
IV. Installation: Step-by-Step
Now let us talk about a step-by-step how to install a shower drain. It is rather simpler than you are expecting.
Step 1: Planning and Measuring
Start by planning the layout of your drain. Determine whether it will be installed in the center, off to the side, or as a linear drain along the wall. The location of your drain impacts the slope of your floor, which must guide water efficiently toward the drain.
Use a level to ensure the slope is correct, generally between 1% and 2%. Make accurate measurements to avoid alignment issues later on. Also, confirm that the plumbing connections under your floor match the outlet direction of the new drain, whether vertical or horizontal.
Step 2: Removing the Old Drain
When you line for a new installation, never leave the old unit behind. Loosen the sealant and un-screw or nuts by using screwdriver or utility knife to remove. Beware not to tear the waterproofing membrane underneath.
After removing the old drain clean the area properly. Scrape everything including dirt stains, old adhesive or pieces of the previous seal off the base’ to leave the base area clean for your new installation. It is an important step on the way to sealing it watertight.
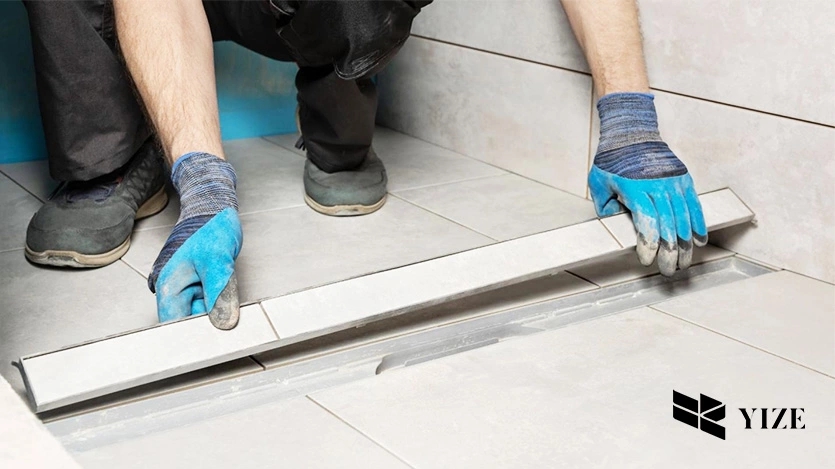
Step 3: Dry Fitting the New Drain
A dry fit is always advised before gluing /sealing anything. Put the new drain into the hole to check if it’s level with the shower floor. Ensure that all parts align properly, including the flange and trap connection. If your shower floor uses tiles, make sure the drain height matches the tile thickness. YZDRAIN drains are often adjustable to accommodate various tile sizes, making installation easier.
Step 4: Applying Sealant and Securing the Drain
Once satisfied with the positioning, apply plumber’s putty or silicone sealant around the underside of the drain flange. Place the drain into the finished hole, pressing downward to make it adhere tightly to the hole itself.
Fix the drain from underneath using screws, or a lock nut, depending on which version you have. Using a pipe wrench, turn the nut just snug turn not so tight that it will crack the flange or strip the threads.
Step 5: Connecting the Drain to the Waste Pipe
Now, you need to join the drain to the waste pipe. Compress the gasket or solvent weld joint connecting most shower drains. Check the manufacturer’s instructions for your respective drain. If using a YZDRAIN unit, these typically include well-marked outlet configurations for easy connection. Make sure that the gasket or joint is aligned and tightened to prevent leaks. If you are attaching to a P-trap, confirm it is in a proper place to block sewer gases from entering.
Step 6: Testing for Leaks and Final Touches
Test the drain for leaks before closing up and sealing the area thoroughly. Pour water into the shower pan and check the drainpipe below. Look for any signs of water escaping. If everything checks out, apply a final bead of silicone around the drain edges on the floor to waterproof the seam. The sealant should be allowed to dry at least for 24 hours before use of the shower.
V. Mistakes You Should Avoid
Even pros mess up sometimes. Don’t fall into these traps:
- Skipping the waterproof membrane
- Using too much (or too little) silicone
- Ignoring the slope of the floor
- Forgetting to test for leaks
Remember: A little mistake now could lead to a big, soggy mess later!

VI. Post-Install Maintenance Tips
Once your drain is in and working like a charm, keep it that way:
- Weekly: Pour hot water down the drain.
- Monthly: Use a baking soda + vinegar mix to break down soap scum.
- Avoid: Hair buildup. Use a drain cover.
VII. What Makes YZDRAIN Stand Out?
YZDRAIN is a proven name in the shower drain industry with more than a decade of experience and a worldwide presence. Our products are made from premium stainless steel and feature anti-odor technology, easy-to-remove filter cores, and different customisation possibilities.
We offer CE, ISO9001, CUPC, and EN1253 certified drains that meet international standards. Whether a DIY homeowner or a contractor, YZDRAIN provides the durability and performance you need for modern bathrooms.
VIII. Conclusion
Installing a shower drain yourself is not as technical as it seems. With the right tools and a step-by-step plan, you can get the job done and save some money. Looking for a good-quality drain that is easy to install and keeps your bathroom fresh? Check YZDRAIN today for the perfect drain for your shower!
FAQs
Q1: Can I install a shower drain without removing the tiles?
Usually, no. You need to see and reach the pipes under the floor to install it correctly and stop leaks, which means taking up some tiles first.
Q2: What kind of drain helps stop clogs and bad smells?
Drains with anti-odor features, like YZDRAIN’s special cores, work best. Select one with a filter that you can remove and clean. The filter helps collect hair and dirt.
Q3: How many hours are required to install a shower drain?
Shower drain installation will take 2-4 hours to complete. Make sure to allow it to seal dry during the night before using the shower.